

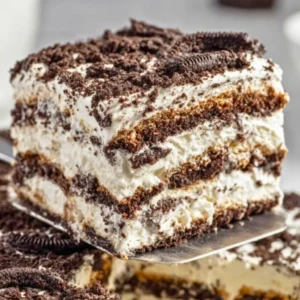
Oreo Icebox Cake: The Ultimate Creamy Cold Dessert
There’s something incredibly comforting about cold desserts on a warm day. As I reminisce about sunny afternoons spent lounging with loved ones, one treat stands out prominently in my mind: the Oreo Icebox Cake. This delightful no-bake treat has graced many family gatherings, bringing smiles and satisfied sighs with every creamy, cookie-studded bite. The way the tender layers of whipped cream meld with soggy yet delightful Oreo cookies creates a blissful harmony that you just can’t resist. Perfect for any occasion, this is an easy weeknight dessert that will whisk you away to sweet nostalgia and make you feel at home. This is one you’ll definitely want to pin for later!
Why You’ll Love This Recipe
- No-Bake Delight: This Oreo Icebox Cake is incredibly easy to whip up—no baking required!
- Family-Friendly Fun: Kids love helping with layers, making it a fun activity for the entire family.
- Crowd-Pleasing Flavor: Rich and creamy with that classic Oreo taste, it’s a dessert everyone will adore.
- Perfectly Versatile: You can easily customize it with different flavors or toppings, turning it into your unique masterpiece.
- Make-Ahead Magic: It’s perfect for busy days; simply prepare it the day before and let it chill in the fridge overnight.
- Great for Gatherings: Whether it’s a warm summer picnic or a cozy winter gathering, this creamy cold dessert fits right in.
What You’ll Need
Gather These Simple Ingredients
- 36 Oreo cookies (plus extra for garnish)
- 2 cups heavy cream
- 1/2 cup powdered sugar
- 1 tsp vanilla extract
- 1 cup milk (for dipping the Oreos)
- Optional: chocolate shavings or crushed Oreos for topping
Let’s Make It Together
Step-by-Step Instructions
- Begin by gathering all your ingredients on a clean countertop, creating a welcoming cooking space.
- In a mixing bowl, combine the heavy cream, powdered sugar, and vanilla extract. Whip this mixture until it forms soft peaks, creating a glorious cloud of creaminess.
- Pour your milk into a shallow dish. This is where the "magic" happens; each Oreo will get a quick dip!
- Take an Oreo, submerge it in the milk for just a second (you want it to soften but not disintegrate), and place it at the bottom of a 9×13 inch baking dish.
- Continue dipping and layering the Oreo cookies across the base of the dish in a single layer until it’s fully covered.
- Spread a layer of your freshly whipped cream over the first layer of Oreos, smoothing it to create a luscious blanket of sweetness.
- Repeat the dipping and layering process for another two or three layers, finishing with a generous amount of whipped cream on top.
- Garnish your masterpiece with extra crushed Oreos or chocolate shavings if you’re feeling indulgent!
- Cover the dish with plastic wrap and refrigerate for at least 4 hours—or better yet, overnight—to let the flavors meld and the cake to chill to perfection.
Delicious Variations to Try
- Mint Chocolate Oreo Icebox Cake: Use Mint Oreos in place of regular ones for a refreshing twist.
- Peanut Butter Delight: Swirl in some creamy peanut butter into the whipped topping for a nutty, zesty flavor.
- Fruity Fresco: Layer in some fresh strawberries or raspberries for a tart burst among the sweet creamy layers.
- Caramel Drizzle: Add a layer of caramel sauce to the whipped cream for an indulgent, rich finish.
Chef Emma’s Helpful Tips
- For the ultimate creamy finish, make sure your heavy cream is chilled before whipping.
- Don’t skimp on refrigeration time; the longer the cake sits, the better the flavors will blend and the cream will soften the cookies.
- To serve, slice with a sharp knife dipped in warm water for smoother cuts.
- Store leftovers tightly covered in the fridge for up to 3 days, though it rarely lasts that long!
Nutrition Information per Serving
- Serving Size: 1 slice
- Calories: 230
- Carbohydrates: 29g
- Sugar: 14g
- Fat: 12g
- Protein: 2g
- Sodium: 100mg
Frequently Asked Questions
Can I make this ahead?
Absolutely! This icebox cake tastes even better the longer it sits, so feel free to make it a day in advance.
Can I use different ingredients?
Yes, you can switch out Oreos for any chocolate sandwich cookie, or even try graham crackers for a lighter version.
How do I store leftovers?
Keep any leftovers tightly covered in the fridge. It will stay fresh for up to 3 days.
How long does it last?
For best texture and flavor, enjoy your Oreo Icebox Cake within 3 days of making it.
A Cozy Closing Note
This Oreo Icebox Cake is not just a dessert; it’s a celebration of life’s sweetest moments—warm sun, laughter, and togetherness over delicious bites. Perfect for any occasion, this recipe always seems to bring the family together, creating lasting memories. Save this Pin by Kaitlyn Palmer on Food 😉 | Oreo dessert recipes, Icebox cake recipes, Cold desserts to your favorite board so it’s ready when you need a cozy treat! I can’t wait for you to try it and share the love!
Oreo Icebox Cake
Ingredients
Main Ingredients
- 36 cookies Oreo cookies (plus extra for garnish)
- 2 cups heavy cream Chilled before whipping
- 1/2 cup powdered sugar
- 1 tsp vanilla extract
- 1 cup milk For dipping the Oreos
Optional Toppings
- to taste chocolate shavings or crushed Oreos For topping
Instructions
Preparation
- Gather all your ingredients on a clean countertop.
- In a mixing bowl, combine the heavy cream, powdered sugar, and vanilla extract. Whip until it forms soft peaks.
- Pour the milk into a shallow dish for dipping the Oreos.
Layering
- Quickly dip each Oreo in the milk and place it in the bottom of a 9x13 inch baking dish.
- Continue layering the Oreos until the base is covered.
- Spread a layer of whipped cream over the Oreos.
- Repeat the process for another 2-3 layers, finishing with whipped cream on top.
Finishing Touch
- Garnish with extra crushed Oreos or chocolate shavings.
- Cover with plastic wrap and refrigerate for at least 4 hours, preferably overnight.